6 Building a Responsive Project
Building a Responsive Project
-
- Start by opening Adobe Captivate and click the “New Project” tab.
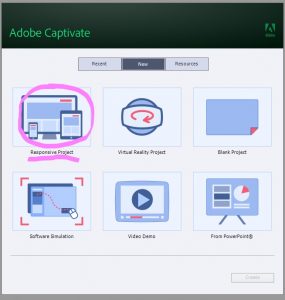
As you can see, there are a variety of project types that you can create – we typically stick to Responsive and Virtual Reality projects since those are the only ones capable of handling 360 content.
2. Select “Responsive Project” and click “Create.”
Once the project opens up, you’ll notice it looks a lot like PowerPoint! That’s because Captivate is Microsoft PowerPoint compatible, and can even import .ppt files to be used as module slides. Click on the plus button at the top left to view the different slide types.
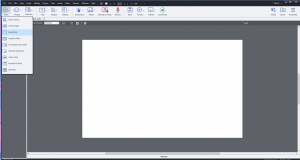
Here’s a quick overview of what each slide can do:
-
- Content Slides – These can be used to create basic text and image slides, just like you would in PowerPoint. If you have applied a theme to the project, that will be the background image of this slide.
- Blank Slides – These slides are the best slides for adding interactive video elements, or designing your own content slide. Since the theme does not apply to this slide type, you will have a blank slate to create your own design.
- Question Slides – This slide type is pretty self-explanatory. There are a variety of different types of quiz questions you can incorporate in your module. We’ll get to those in a second! *Note: If there will be a lot of emphasis on the questions in the module, a Responsive project will be preferable because a VR project has very few question type options.
- Knowledge Check Slide – These slides can be overlaid on top of videos that are playing on blank or content slides. This allows you to include pop-up quiz questions in your videos.
- Software Slide – Software slides allow you to create a “demo” for a product or software you may be using or trying to promote. It has directly editable objects and elements, and can process code.
- Video Demo Slide – This slide allows you to import other presentations or videos and edit them as you would in basic film editing software such as iMovie or Premiere.
- PowerPoint Slide – This is a slide type that can be directly imported from Microsoft PowerPoint. Once you’ve imported your PowerPoint file, you can add Captivate elements to it such as quiz questions and interactive videos.
- 360 Slide – This is the only slide type that is 360 capable. In order to create any VR immersive environment, you will need to import your 360 footage to this slide.
In this chapter, we’ll be covering how to use 360 and Quiz slides (these are the most important for our purposes).
Creating a 360 Slide with Hotspots

To import a 360 image, click the plus sign in the middle of the slide. This will open up your file finder, and you can navigate to where you have stored your 360 images. Note: 360 images must be saved in a .JPEG format in order to import correctly.
Once you’ve imported the image, it will look something like this:
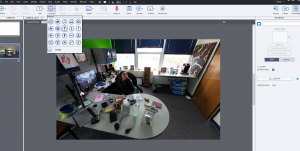
Notice the blue spot in the middle? That’s a hotspot! Hotspots can be used to engage students. When you click on them, they perform different actions.
Here’s a quick overview of what a hotspot can do:
-
- Display Text – When clicked, the hotspot will display a passage of text. You can change the font, size, color, and position of the text to fit your needs.
- Play Audio – When clicked it allows an audio file to be played until the button is clicked out of. You can change the audio file within captivate by clicking on the hotspot.
- Display Image – This will open a 2D image into the viewer’s plane of vision. It must be “x’d” out of in order
- Display Video – This will open an embedded 2D video that viewers are able to play and manipulate. However, this feature does not support YouTube Videos or 360 videos. It also does not allow captivate pop-ups, so all captions must be added before the video is embedded.
- Jump Buttons – “Jump” hotspots allow the viewer to move between captivate slides. This feature closely resembles jump buttons in Microsoft PowerPoint.
- Go to next slide/Go to previous slide – These options are self-explanatory. Use the next slide option to go to the next 360 image or Video slide. Same as the previous slide option.
- Exit – Also self-explanatory. This option is used as a button to click out of the module or “Exit.”
- Jump to slide – For some instances, if needed to jump back to the main location slide for part of a module, this option will take you from the last slide to the beginning slide or any other slide.
- No Action – This option is perfect to use when there is no action needed at this time. When waiting for a video or image, this is a place holder option for the button. When ready, this action can be changed at any time during the process.
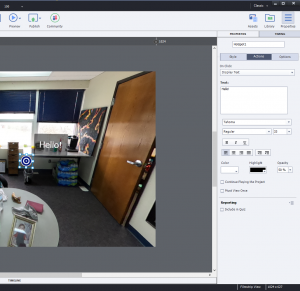
This image shows the process of creating a “Display Text” hotspot. As you can see, there’s a box where you can type your text. You also have standard formatting options for your text, and can add a variety of styles.
Quiz Slides
Quiz slides are unique to Responsive Projects. Although you can add quiz pop-ups in 360 Projects, there are a lot more options in this project style. To create a quiz slide, click on the plus button at the top left corner and select “Question Slide.”
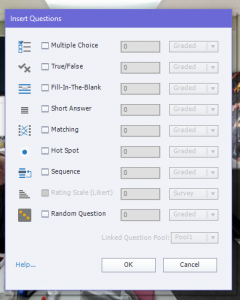
These are the types of question slides that you can create in a Responsive Project. The easiest slides to start with are Multiple Choice and True or False; however, as you learn more you may want to add a variety of question types such as drag-and-drop.
Select the type of question you would like by clicking on the white square next to the title. To create more than one slide of each type, change the number “0” to the amount you want to create.
Once you’ve selected your question types, click “ok.”
For this example we’re going to focus on Multiple Choice questions.
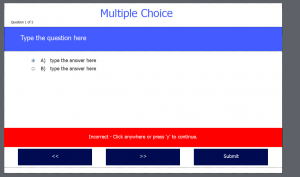
This is what a typical Multiple Choice slide will look like once you create it. To change the amount of available answers, you can double-click on the slide to open up the “Properties” menu, just like we did before with the hotspots.
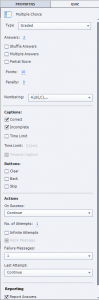
This properties menu has a lot more options than the ones we worked with for the hotspots, but the process is still relatively simple.
To change the amount of answer choices, drag the number 2 next to “Answers” to the right. It will increase up to 15.
To allow multiple correct answers, shuffle, or take a partial score just click on the white box next to the listed options.
Points are automatically set to 10; however, just as you can increase the answer choices by dragging the number, you can do that here as well.
Be sure to click the white box next to “clear” if you would like your student to have an opportunity to select different answers if they miss-click.
To set up the correct answer, just click on the clear circle next to the answer choice you want to be correct. Once it’s set up, it will turn blue. (See the answer choices on the example above, the correct answer has a blue circle next to it).
