7 Accessibility
Learning Objectives
This chapter will support learners in being able to:
- Explain universal design and how it improves accessibility for all learners
- Identify steps for choosing and using accessible OER
- List three ways accessibility must be considered when adopting OER
- Reflect on accessibility of current teaching resources and how they can be improved
Accessibility and Universal Design
Faculty are required to ensure that the teaching materials they use are accessible to all students. Applying a universal design approach to your curriculum allows you to improve accessibility for all learners.
Ron Mace and colleagues at North Carolina State University coined the term Universal Design (UD), with the understanding that designing to meet the needs of disabled people benefits everyone. For example, a curb cutout, designed to accommodate wheelchairs transitioning from sidewalks to streets, also benefits people with strollers, bike riders, and people who may have depth issues.
What Does UD Mean for Learning and Curriculum Design?
Universal design means that we design courses that are the most useful to the most different types of people. A proactive approach improves accessibility for all students. For example, although closed captions are added for deaf students, many students may use them when watching online videos in the library or if they are learning English. Using a UD framework makes our courses more user-friendly for all learners.
An Overview of Accessibility
As instructors, we have legal and ethical obligations to ensure that our courses are fully accessible to all learners, including those with disabilities. We use digital resources in our courses because we believe they enhance learning. However, unless carefully chosen with accessibility in mind, these resources can have the opposite effect for students with disabilities, erecting daunting barriers that make learning difficult or impossible. For example, consider the accessibility challenges students described below might face.
- Students who are deaf or hard of hearing are unable to access the contents of a video presentation unless it’s captioned.
- Students who are blind or visually impaired use assistive technologies such as audible screen reader software or Braille devices to access the content of websites, online documents, and other digital resources. They depend on authors providing alternate text that describes the content of images as well as headings, subheadings, lists, and other markup that helps them understand the structure and outline of the resource.
- Some students who have learning disabilities such as dyslexia use assistive technologies that visibly highlight digital text as it’s read aloud, and are therefore dependent on text being readable (as opposed to a scanned image).
- Students who are physically unable to use a mouse are unable to use interactive web and software applications unless these applications can be operated with a keyboard.
- Students who are color blind may be unable to understand content that communicates information solely using color (for example, a bar chart with color as the sole means of differentiating between the bars).
The Web Content Accessibility Guidelines (WCAG) 2.0, developed by the World Wide Web Consortium, provide an international standard that defines accessibility of web-based resources. The principles of WCAG 2.0 are applicable to other digital assets as well, including software, video, and digital documents. The DO-IT (Disabilities, Opportunities, Internetworking, and Technology) at the University of Washington has a wealth of resources available to instructors on universal design in the classroom and in digital resources. Their Accessibility Checklist can help anyone creating or choosing digital resources to understand the accessibility requirements related to the features and functions of those resources.
The rest of this module provides tips for ensuring that the resources you’re choosing for your course are accessible to all learners.
Choosing and Using Accessible Video
When selecting video, be sure to choose videos that include accurate closed captioning. Closed captions provide a text version of the spoken audio and other critical sounds, displayed in sync with the video.
Closed captions make video accessible to students who are deaf or hard of hearing but also benefit many others: they help second-language students understand the spoken audio; they help all students learn the spelling of the words that are being spoken; they make it possible to search the video for specific content; and they can be repurposed as an interactive transcript, which is a great feature for everyone!
Captions are supported by all major video hosting services including YouTube and Vimeo. If a video is captioned, it will have a CC button on the video player.
Additionally, when selecting audio files (like a Podcast) be sure the file also has a full written transcript available.

Video Resources
YouTube automatically captions most videos that are uploaded to its website. However, automatic captions, which are created by a computer, are not accurate enough to be relied upon (consider the effect of one missed “not” on the meaning of the video). To check whether a video has reasonably accurate captions created by humans, click the CC button on the video player to turn captions on, and watch a few short segments of the video.
Consult the following resources for additional information on finding videos that have captions:
If you find an open-licensed video that is perfect for your course but does not currently have captions, caption it! Here’s how:
- YouTube: How to contribute subtitles and closed captions
- TED Open Translation Project
- Khan Academy: Volunteer
- Amara – a free tool for captioning and subtitling any public video
Choosing and Using Accessible Images
If images are used to communicate information, they should include short text descriptions for individuals who are unable to see the images. These short descriptions are typically referred to as “alternate text” or “alt text.”
Most authoring tools that support adding images to content also support adding alt text to an image. When you’re adding an image to a web page or document, simply look for an “alt text” field in the Image Properties dialog and enter a short description into the space provided. If the authoring tools do not support “alt text,” include a description of the image after the figure title.
Note, any images with words, such as screen capture of a quote or “tweet,” should include a transcript of the words displayed in the images. This is also good practice when you’re sharing these images on social media!
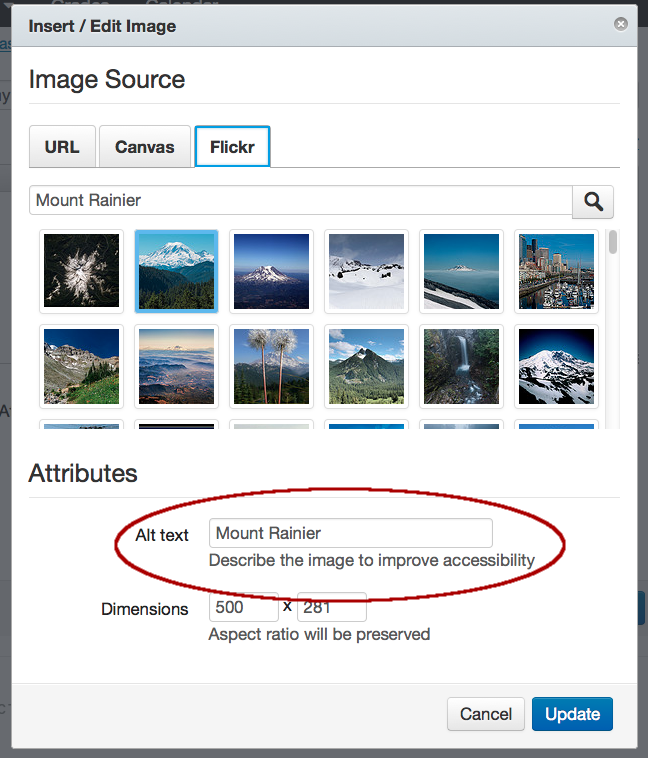
Image Resources
The alt text that you enter for a particular image depends on the context. Think about what you’re wanting to communicate by adding the image. Then, add alt text that will communicate the same idea to someone who is unable to see the image.
The following resources provide additional guidance for writing good alt text.
- WebAIM: Alternate Text
- Guidelines for Describing STEM Images – National Center for Accessible Media
If the image contains important detail that is too complex to be described in one or two brief sentences (for example, a chart or graph), then the text description will need to be provided separately from the image, either within surrounding text on the same page, or on a separate page that is accessible via a link on the main page. Remember, if it is an image of text, you must provide a transcript.
Choosing and Using Accessible Course Material
When choosing among the wide variety of course materials that are available be sure to consider whether these materials might present challenges or barriers for students with disabilities. Ask specific questions, such as:
- Is all written content presented as text, so students using assistive technologies can read it?
- If the materials include images, is the important information from the images adequately communicated with accompanying alt text?
- If the materials include audio or video content, is it captioned or transcribed?
- If the materials have a clear visual structure including headings, sub-headings, lists, and tables, is this structure properly coded so it’s accessible to blind students using screen readers?
- If the materials include buttons, controls, drag-and-drop, or other interactive features that are operable with a mouse, can they also be operated with a keyboard alone for students who are physically unable to use a mouse?
- Do the materials avoid communicating information using color alone (e.g., the red line means X, the green line means Y)?
If you find open course materials that are perfect for your course but you are unable to answer “Yes” to each of the above questions, contact the author and talk to them about accessibility. Your feedback may inspire them to improve the accessibility of their materials, which will benefit everyone!
Choosing and Using Accessible Textbooks
Many of the downloadable textbooks available through the sites like OpenStax or Open Textbook Library provide textbooks in PDF format. PDF, like most other document formats, includes support for accessibility features such as headings, subheadings, lists, and alt text on images, but the author and/or publisher must make a conscious effort to include these features.
In order to support accessibility features, a PDF file must be tagged. A tagged PDF is a type of PDF that includes an underlying tagged structure that enables headings to be identified as headings, lists as lists, images as images with alt text, etc. Tags provide the foundation on which accessibility can be built. To determine whether a particular PDF is tagged, open it in Adobe Acrobat or Adobe Reader and go to Document Properties (Ctrl + D in Windows; Command + D in Mac OS X). In the lower left corner of the Document Properties dialog, “Tagged” is either “Yes” or “No.”
Resources
The following resources provide additional guidance for creating accessible documents, particularly in PDF, and on evaluating whether PDFs are accessible and if not, fixing their accessibility problems. Additionally, reach out to staff at your institution, such as Instructional Designers or an accessibility support specialist, for help and guidance.
- Adobe: PDF Accessibility Overview
- WebAIM: PDF Accessibility
- BC Campus Open Education Accessibility Toolkit
If you find an open textbook that is perfect for your course but is not accessible, contact the author and talk to them about accessibility.
Check Your Understanding
To complete the Module 5 Final Activity (the first step in earning OCO’s OER Champion badge), return to OER: A Deeper Dive Module 5.
Attributions
Information for this module was consulted and adapted from
“Open Washington Learn OER – Module 9: Accessibility” by Open Washington is licensed under CC BY 4.0
